
Have you tried interactive notebooks? They can seem daunting in the beginning, but provide students with a meaningful resource they can refer back to for years. Check out this post for my top tips on how to use interactive notebooks effectively.
While interactive notebooks are proven to be a great way for students to organize their thinking and notes they can also be a huge mess. All the cutting, gluing, and coloring can get out of hand quickly and make the interactive notebook process a real headache.
Instead of getting frustrated, get organized with these tips for making interactive notebooks easier to manage effectively.
The links in this post are Amazon Affiliate links. I only link to products I use and love. The price is not changed through the link, but I may earn a little bit if you choose to purchase.
I am a huge fan of my guillotine style paper cutter. Once I copy each activity I use the paper cutter to quickly trim the extra paper from around the actual fold-up. If the fold-up is all straight lines this means students will only have to cut on the dotted lines to make the individual flaps.
What will take me less than a minute with the paper cutter would have potentially taken my students five valuable minutes during the instructional block.
If you are unable to pre-cut activities ahead of time make it part of your students’ morning routine. Even if you won’t use the activity until the end of the day, leave their papers to cut on their desks first thing in the morning. This gets all the cutting out of the way ahead of time.
I too love glue sticks, but the truth is they don’t really stick. They also are much more expensive than bottled glue. I also can’t stand the constant loss of lids that causes them to dry out. To say the least, I am not a fan of them in the classroom.
Instead, I use liquid glue. Just the regular old white glue that can be purchased inexpensively at the beginning of the year. I already know what you are thinking… what a mess, but there is a solution for you! I used these Tap-N-Glue Caps to control the output of glue. No matter how hard students press they only allow one dot of glue out at a time. I will admit, they are quite pricey, but I had the same caps for five years (on the same bottles of glue too) and my coworker still uses them in her classroom. The only care needed is to take them off and soak them in soapy water twice a year. I did this at winter break and summer break. Serious lifesaver.
I have also seen a ton of people who use glue sponges, and I will admit I am intrigued but have not actually tried them myself.
I am not a fan of spirals. Pages come out, the spiral unwinds, and students mess with them.
Instead, I prefer these composition books. They are bound and tied, have sturdy covers, and close tightly each time. They are slightly smaller than a spiral notebook, so I copy interactive notebook activities at 80% to ensure they fit.
These composition books pass the test of time, and I have yet to have a student not make it through the year with their notebook intact.
On the very first day of school each year we took the time to set up our interactive notebooks. This included making sure everyone had a composition book, labeling the notebook, going over expectations, and getting started with a table of contents.
I prefer to use this Notebook Start-Up Kit to get students used to cutting, gluing, and coloring inside their notebooks. I prefer to have students color last because it motivates them to complete the activity.
One of my favorite things about interactive notebooks is the ability to scaffold and differentiate for each student. One of the ways I do this is to provide multiple templates for each notebook activity. There are blank, fill in the blank, and completed templates.
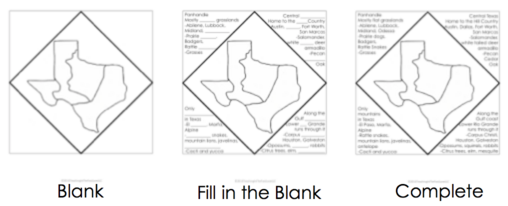
This setup allows me to provide each student with what they need. It also makes it easier for me to make sure absent students have all the information they need.
You can check out my Texas History Interactive Notebook Bundle or U.S. History Interactive Notebook Bundle which each have this style of differentiation along with writing prompts for every activity. You can also receive a FREE notebook kit below by signing up for my email newsletter.

Subscribe to get our weekly newsletter and your FREE Texas Regions notebook!
Success! Now check your email to confirm your subscription and download your FREE Texas Regions INB activities!